How to Use a Kill A Watt Meter: The Renter's Guide to Finding Energy Hogs (2026)
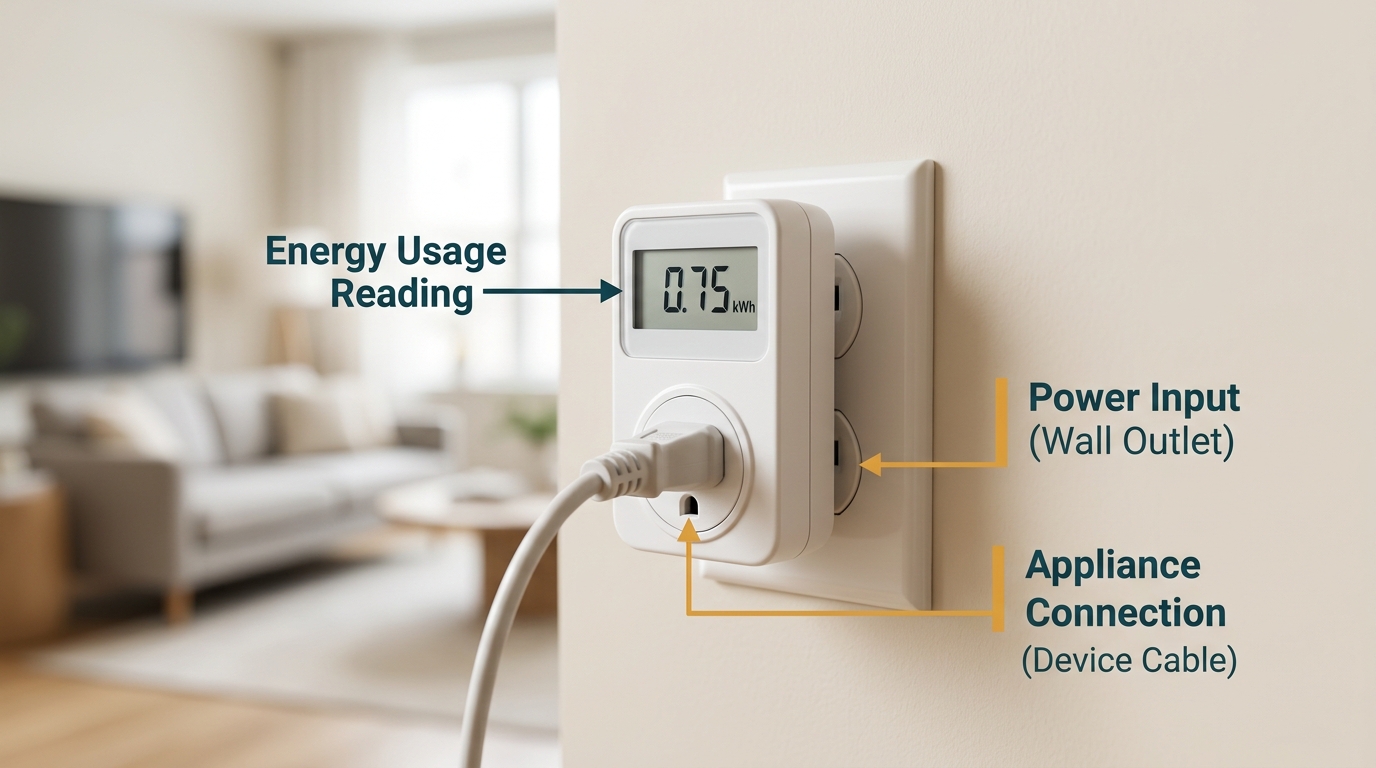
Kill A Watt meter: measure before you try to save
By WattDweller Editorial Team · Updated September 24, 2026
If you’ve read our Vampire Power in Rentals guide, you know that hidden devices can drain $250–$400 per year from your electricity bill. And if you’ve read our How to Read Your Apartment Electricity Bill guide, you understand the anatomy of your bill.
But here’s the gap: you still don’t know which specific appliances are the culprits.
Your bill tells you the total. It doesn’t tell you that your cable box costs $130/year while your microwave costs $5/year. For that, you need a plug-in electricity meter — and the most popular one for renters is the P3 P4400 Kill A Watt.
This device is tiny, costs about $25, requires no installation, and works in any apartment. You plug it into the wall, plug an appliance into it, and let it run. After 24 hours, you’ll know exactly how much that appliance costs you per day, per month, and per year.
In this guide, we’ll show you exactly how to use a Kill A Watt meter step-by-step, how to interpret its readings, and how to turn those readings into a savings plan. By the end, you’ll have a complete energy audit of your apartment — without hiring an auditor or spending more than $25.
🛒 Check Kill A Watt Price on Amazon💡 Ready to start? The Kill A Watt P4400 is the same tool professional energy auditors use — and it pays for itself in the first month of measurement.
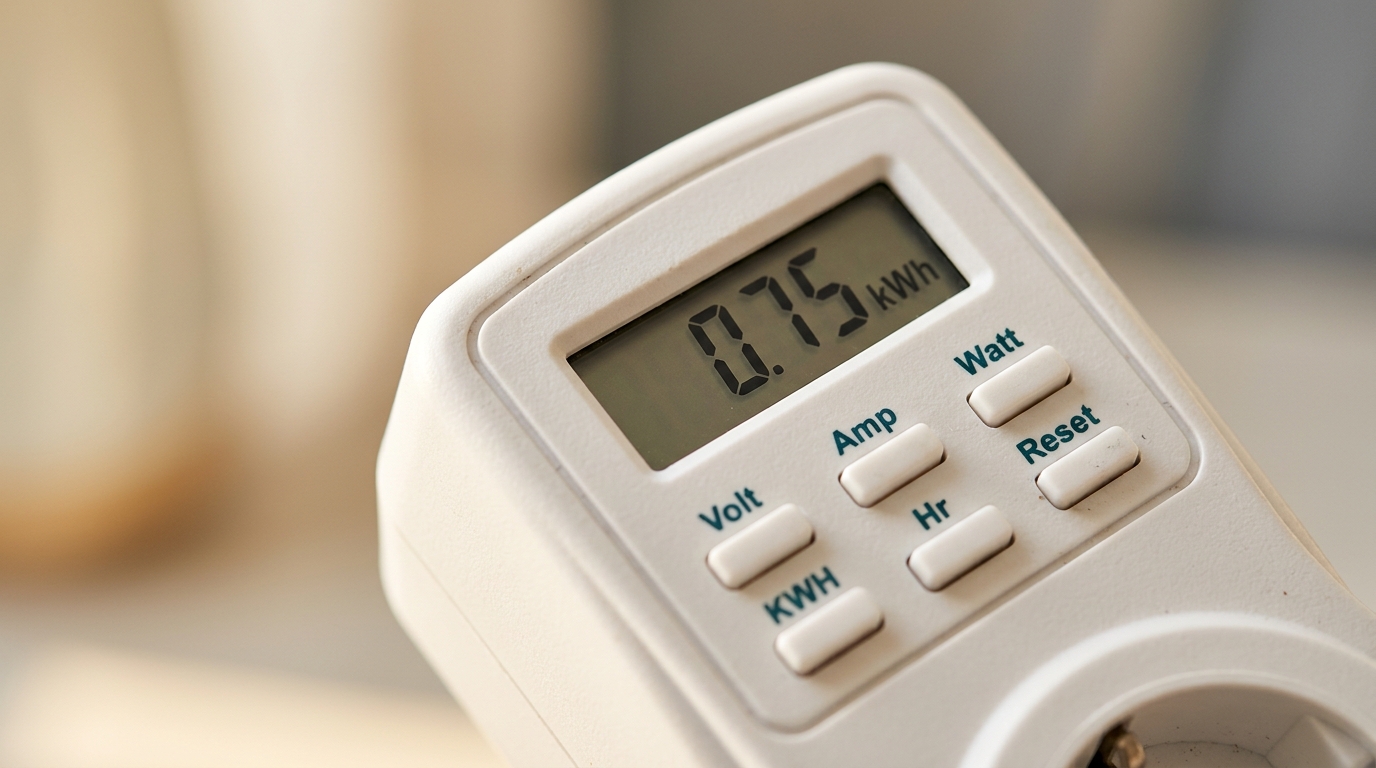
Kill A Watt meter: buttons, display, and what each reading means
Quick Summary: The Renter’s Energy Audit in 5 Steps
If you’re short on time, here’s the entire process:
| Step | Action | Time Required |
|---|---|---|
| 1 | Buy a Kill A Watt meter (~$25) | 1 day shipping |
| 2 | List your 10 most-used appliances | 5 minutes |
| 3 | Measure each appliance for 24 hours | 10 days total |
| 4 | Calculate annual cost per appliance | 15 minutes |
| 5 | Target the top 3 for savings | Ongoing |
Total investment: ~$25 + 30 minutes of your time. Potential savings: $100–$400/year.
Bottom line: A Kill A Watt meter is the single best $25 investment a renter can make. It replaces guessing with data.
🛒 Get the Kill A Watt on AmazonNow let’s break it down.
Chapter 1: What Is a Kill A Watt Meter (And Why Renters Need One)
The P3 P4400 Kill A Watt is a plug-in electricity usage monitor. It’s about the size of a thick smartphone, plugs into any standard wall outlet (NEMA 5-15), and has a female outlet on the front for your appliance to plug into.
What It Measures
The Kill A Watt measures and displays:
| Reading | What It Means | Why You Care |
|---|---|---|
| Volt (V) | The voltage of your outlet | Should read 110–125V in U.S. apartments |
| Amp (A) | Current draw of the appliance | Tells you how much power it’s pulling right now |
| Watt (W) | Real-time power consumption | The most useful reading for identifying hogs |
| KWH | Cumulative energy used since reset | The key number for cost calculation |
| Hr | Hours elapsed since reset | Used with KWH to calculate averages |
| Hz | Frequency of your electricity | Should read 60 Hz in U.S. |
Why Renters Specifically Need One
If you own your home, you might invest in a whole-home energy monitoring system ($200–$500). But as a renter:
- ❌ You can’t install a whole-home monitor on the electrical panel
- ❌ You can’t install a smart meter (utility owns it)
- ❌ You can’t rewire your apartment for submetering
- ✅ But you CAN plug a Kill A Watt into any outlet
This is the single most powerful diagnostic tool available to renters — because it works at the appliance level, which is exactly where renters have control.
What It Doesn’t Do
Setting realistic expectations:
- ❌ It doesn’t control your appliances (it only measures)
- ❌ It doesn’t send data to your phone (it has no Wi-Fi or Bluetooth)
- ❌ It doesn’t work for hardwired appliances (like central AC or water heater)
- ❌ It doesn’t measure gas usage (only electricity)
For automation, you’d pair it with a smart plug (see our Best Smart Plugs for Apartments guide). For hardwired appliances, you’d need a whole-home monitor or a clamp meter — which most renters can’t use.
🛒 Check Kill A Watt Price on Amazon💡 Want to grab the meter before reading further? The P3 P4400 Kill A Watt is the standard model for renter energy audits.
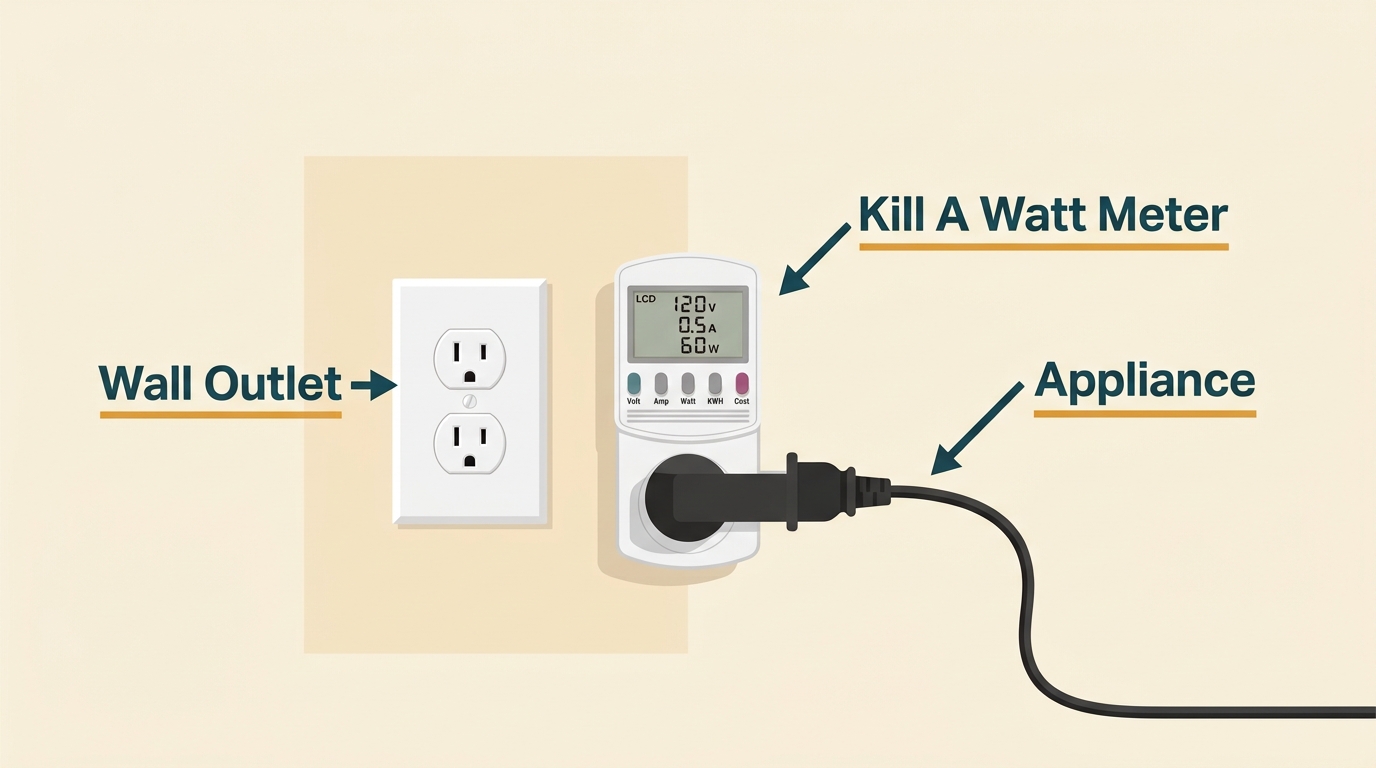
How the Kill A Watt measures volts, amps, watts, and kWh
The One Purchase Renters Overlook
Most renters buy air purifiers, smart plugs, or LED bulbs without ever measuring their appliances. Then they wonder why their electricity bill is still high.
Here’s the reality: every apartment’s energy profile is different. Your neighbor might save $200/year by unplugging their gaming console. But if you don’t own a console, that advice doesn’t apply.
The Kill A Watt lets you build a personalized savings plan based on your actual appliances. It’s the difference between following generic advice and solving your specific problem.
Chapter 2: How to Use the Kill A Watt (Step-by-Step)
The Kill A Watt is famously simple to use. There are no apps, no setup menus, and no Wi-Fi pairing. Here’s the complete process.
What’s in the Box
- Kill A Watt meter (1 unit)
- Quick start guide (usually 1 page)
- That’s it.
No cables. No adapters. No batteries. The Kill A Watt draws its power from the outlet it’s plugged into.
The 6-Button Layout
Before you start, know what each button does:
| Button | Function | When to Use |
|---|---|---|
| Volt | Displays voltage | First check — verify outlet is normal |
| Amp | Displays current draw | Optional — useful for troubleshooting |
| Watt | Displays real-time power consumption | Most useful for finding hogs |
| KWH | Displays cumulative energy used | Key for cost calculation |
| Hr | Displays elapsed time | Used with KWH |
| Reset | Clears all readings to zero | Before starting a new measurement |
Step-by-Step Instructions
Step 1: Unbox and Inspect
Remove the Kill A Watt from its packaging. Check that the LCD display is intact and the prongs on the back are straight. If the display is blank, don’t worry — it powers on when you plug it in.
Step 2: Choose Your First Appliance
Start with the one device you suspect uses the most electricity. This is usually:
- Refrigerator (if you have a second one)
- Cable/satellite box
- Gaming console
- Desktop computer
- Space heater (in winter)
- Window or portable AC (in summer)
Don’t start with a low-power device like a phone charger or LED lamp. You’ll get bored and quit.
Step 3: Plug the Kill A Watt Into the Wall
Plug the Kill A Watt into a wall outlet that’s easily accessible and near the appliance.
Important: Use a wall outlet, not a power strip. The Kill A Watt should be the first thing plugged into the wall for the most accurate reading.
Step 4: Plug the Appliance Into the Kill A Watt
Now plug your appliance into the female outlet on the front of the Kill A Watt.
The appliance is now drawing power through the meter. The meter is tracking every watt-hour used.
Step 5: Press “Reset” to Zero the Meter
Press the Reset button. This clears all previous readings. You’re starting fresh.
Verify the display shows 0.00 KWH (or close to it).
Step 6: Let It Run for 24 Hours (or More)
This is the part that requires patience. Leave the appliance plugged in through the Kill A Watt for at least 24 hours.
Why 24 hours? Because appliances cycle on and off throughout the day:
- A refrigerator runs more at night when the kitchen is cooler
- A TV runs more in the evening when you’re home
- A space heater runs in bursts based on the thermostat
A 24-hour measurement captures the full daily cycle. For appliances with very variable usage (like a washing machine), leave it plugged in for a week to capture all cycles.
Step 7: Read the KWH and Hr Buttons
After 24 hours, press:
- KWH button → Note the total kWh consumed
- Hr button → Note the hours elapsed
Example: If the KWH reads 1.20 and the Hr reads 24, the appliance used 1.20 kWh over 24 hours.
Step 8: Calculate the Cost
Use this formula:
Daily Cost = KWH × Your Electricity Rate Annual Cost = Daily Cost × 365
Example: If your rate is $0.16/kWh and the appliance used 1.20 kWh:
Daily Cost = 1.20 × $0.16 = $0.19 per day Annual Cost = $0.19 × 365 = $70 per year
That’s a $70/year appliance. Now you know.
Step 9: Move to the Next Appliance
Unplug the appliance, plug it back into the wall normally, and move the Kill A Watt to the next device on your list. Repeat steps 3–8.
Step 10: Build Your “Energy Hog” List
After measuring 5–10 appliances, you’ll have a list like this:
| Appliance | Daily kWh | Annual Cost |
|---|---|---|
| Cable box | 0.50 | $29 |
| Gaming console (standby) | 0.35 | $20 |
| Desktop computer (24/7) | 0.45 | $26 |
| Old refrigerator | 2.80 | $163 |
| Microwave (standby) | 0.02 | $1 |
| Coffee maker (standby) | 0.01 | $0.50 |
| Inkjet printer (standby) | 0.03 | $1.75 |
Total: $240/year just from these 7 devices.
Now you know exactly where to focus. This is your personalized savings plan.
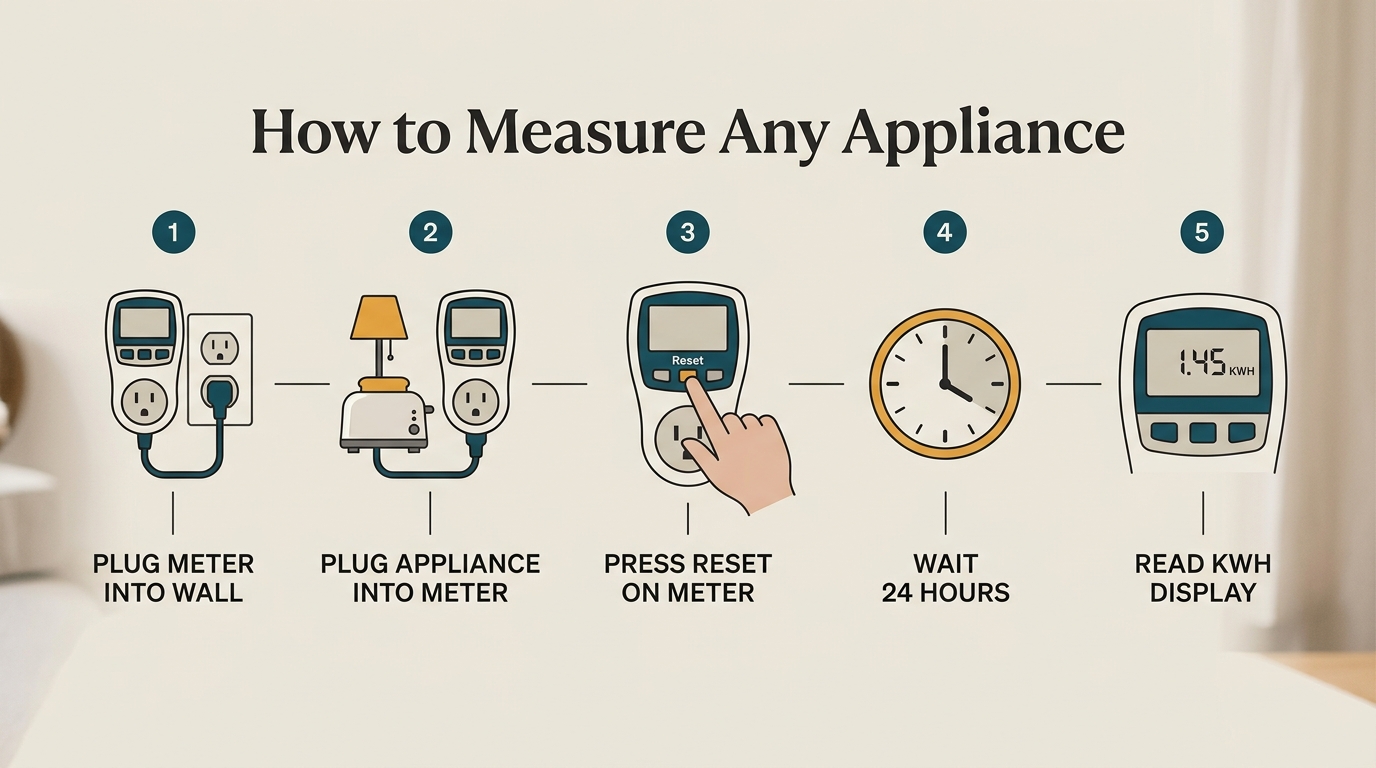
Your audit workflow: measure → record → prioritize → act
Pro Tips for Accurate Measurements
Tip 1: Measure During Normal Use
Don’t measure your refrigerator during a vacation week when you’re not home. Measure it during a normal week so the reading reflects actual usage.
Tip 2: Watch the Watt Reading in Real-Time
The Watt button shows live consumption. Press it while an appliance cycles on and off:
- When your refrigerator compressor kicks on: ~150–200W
- When it’s idle: ~5–10W
- When your TV is “off” but plugged in: ~5–15W (this is vampire power)
This real-time view is educational — you’ll see when appliances are drawing power.
Tip 3: Check Voltage First
Before measuring anything, press the Volt button. If it reads outside 110–125V, your outlet may have an issue (which could affect appliance efficiency). Report to your landlord if it’s consistently out of range.
Tip 4: Use a Surge Protector (Optional)
If you’re measuring an expensive appliance (like a laptop or TV), you can plug a surge protector into the Kill A Watt, then plug the appliance into the surge protector. This adds protection without affecting the reading.
Tip 5: Document Everything
Take photos of each reading or write them down immediately. After 10 appliances, you’ll forget which reading belonged to which.
Common Mistakes to Avoid
| Mistake | Why It’s a Problem | Fix |
|---|---|---|
| Measuring for only a few hours | Misses daily cycles | Measure for 24+ hours |
| Forgetting to press Reset | Readings include previous appliance | Always Reset first |
| Measuring appliances that are rarely used | Wastes time | Focus on 24/7 appliances first |
| Using a power strip before the meter | Can affect readings | Plug meter directly into wall |
| Assuming your rate is the national average | Wildly inaccurate | Check your actual bill |
Chapter 3: How to Interpret Your Readings
Now that you have data, let’s make sense of it.
Understanding the “Watt” Reading
The Watt reading shows real-time power consumption. Here’s how to interpret common numbers:
| Watt Reading | What It Likely Means |
|---|---|
| 0.5–5W | Vampire power (device is “off” but still drawing) |
| 5–20W | Standby mode (device is in sleep/low-power state) |
| 20–60W | Small appliance running normally (LED TV, laptop charger, fan) |
| 60–200W | Medium appliance (desktop computer, refrigerator compressor, gaming console in use) |
| 200–500W | Large appliance (space heater on low, older refrigerator, window AC) |
| 500–1,500W | Very large appliance (space heater on high, microwave, hair dryer, portable AC) |
| 1,500W+ | High-draw appliance (electric kettle, toaster oven, portable space heater on max) |
Context: A typical U.S. apartment has a 15-amp circuit (1,800W max per outlet). If you’re measuring an appliance that draws more than 1,500W consistently, you’re using 80%+ of the circuit capacity — be careful about plugging in multiple high-draw appliances on the same circuit.
Understanding the KWH Reading
The KWH reading is the cumulative energy used since the last reset. This is your key number for cost calculation.
Reference points for common apartment appliances:
| Appliance | Typical Daily KWH | Annual Cost (at $0.16/kWh) |
|---|---|---|
| LED bulb (10W, 5 hrs/day) | 0.05 | $3 |
| Incandescent bulb (60W, 5 hrs/day) | 0.30 | $18 |
| Phone charger (idle) | 0.01 | $0.50 |
| Microwave (standby) | 0.02 | $1 |
| Coffee maker (standby) | 0.01 | $0.50 |
| Wi-Fi router (24/7) | 0.15 | $9 |
| Cable/satellite box (24/7) | 0.50 | $29 |
| Gaming console (standby) | 0.35 | $20 |
| Desktop computer (24/7) | 0.45 | $26 |
| Laptop (8 hrs/day) | 0.20 | $12 |
| Refrigerator (modern, Energy Star) | 1.20 | $70 |
| Refrigerator (pre-2000) | 2.80 | $163 |
| Window AC (8 hrs/day) | 3.44 | $66 (seasonal) |
| Portable AC (8 hrs/day) | 7.04 | $135 (seasonal) |
Note: These are averages. Your actual readings will vary based on appliance age, model, and usage patterns.
💡 Key insight: A single old refrigerator can cost more to run than 20 LED bulbs combined. This is why measuring — not guessing — matters.
Calculating Cost: The Complete Formula
Here’s the complete formula for turning KWH into dollars:
Cost = KWH × Electricity Rate
Where:
- KWH = reading from the meter
- Electricity Rate = your $/kWh rate from your bill
To find your rate:
Look at your electricity bill. Find the “Energy Charge” section. Divide the total energy charge by the total kWh used.
Example:
- Energy Charge: $45.00
- Total kWh: 300
- Rate: $45 ÷ 300 = $0.15/kWh
If you don’t have your bill handy: Use $0.16/kWh as a U.S. average estimate. This is accurate enough for comparison purposes.
Annualizing Your Readings
The Kill A Watt gives you daily data. Here’s how to convert to annual:
Annual Cost = Daily Cost × 365
Example: If your cable box costs $0.08/day:
$0.08 × 365 = $29.20 per year
For seasonal appliances (AC, space heater), multiply by the number of days you actually use them:
Seasonal Cost = Daily Cost × Days of Use per Season
Example: Portable AC used 120 days per year:
$1.13/day × 120 days = $135.60 per season
The “Payback Period” Calculation
For any appliance you’re considering replacing or upgrading, calculate the payback:
Payback (years) = Upgrade Cost ÷ Annual Savings
Example: You want to replace an old refrigerator ($163/year) with a new Energy Star model ($70/year). New fridge costs $600.
Annual Savings = $163 − $70 = $93 Payback = $600 ÷ $93 = 6.5 years
Verdict: A 6.5-year payback is reasonable for a major appliance. But if you’re renting and might move before then, it’s not worth it — unless your landlord pays for it.
💡 Renter tip: For small upgrades (LED bulbs, smart plugs, power strips), payback is usually measured in months, not years. That’s why those are the best renter investments.
Chapter 4: The Complete Apartment Energy Audit (Walkthrough)
Now that you know how to use the meter, let’s walk through a complete audit. This is exactly how you’d do it in a real apartment — room by room.
Before You Start: Set Up Your Tracking
Open a spreadsheet (Google Sheets, Excel, or even a notebook) with these columns:
| Appliance | Room | Daily KWH | Daily Cost | Annual Cost | Priority |
|---|---|---|---|---|---|
| (to be filled) |
Priority levels:
- 🔴 High: Annual cost > $30, or device runs 24/7
- 🟡 Medium: Annual cost $10–$30
- 🟢 Low: Annual cost < $10
You’ll fill this in as you measure each appliance.
The Full Audit: Room-by-Room
Total time commitment: ~30 minutes of setup + 10 days of passive measurement.
Room 1: Living Room / Entertainment Center
Measure these appliances:
- TV (especially older plasmas or large LCDs — they draw more than you think)
- Cable/satellite box (the #1 vampire power offender — usually runs 24/7)
- Streaming device (Roku, Fire TV, Apple TV — draws power even when “off”)
- Soundbar or AV receiver
- Game console (if in living room)
What to expect:
- Cable box: $25–$40/year (often the highest in this room)
- TV (modern): $15–$30/year
- Streaming device: $5–$10/year
- Soundbar: $3–$8/year
Quick wins in this room:
- Plug the entire entertainment center into an advanced power strip that cuts power when the TV is off
- Schedule the cable box to power off overnight (if it doesn’t record)
Room 2: Bedroom
Measure these appliances:
- Phone charger (idle draw is tiny but adds up with multiple chargers)
- Bedside lamps (LED vs. incandescent matters)
- Alarm clock (digital clocks draw 1–3W continuously)
- Air purifier (if you have one — often runs 24/7)
- White noise machine
What to expect:
- LED lamp (5 hrs/day): $2–$4/year
- Incandescent lamp (5 hrs/day): $15–$20/year
- Phone charger (idle): $0.50–$1/year each
- Air purifier (24/7): $20–$40/year
Quick wins in this room:
- Replace incandescent lamps with LEDs (immediate 80% reduction)
- Unplug chargers when not in use (or use a power strip)
- Choose an air purifier with an auto mode and Energy Star rating
Room 3: Kitchen
Measure these appliances:
- Refrigerator (the biggest energy user in most apartments)
- Microwave (standby draw from the digital clock)
- Coffee maker (keep-warm feature)
- Dishwasher (if you run it — measure a full cycle)
- Toaster oven (rarely used, but worth measuring)
- Small appliances (kettle, rice cooker, blender)
What to expect:
- Modern refrigerator (Energy Star): $60–$80/year
- Older refrigerator (pre-2000): $150–$200/year
- Microwave (standby): $1–$3/year
- Coffee maker (standby): $0.50–$2/year
- Dishwasher (1 cycle/day): $30–$50/year
Quick wins in this room:
- If your refrigerator is old, measure it first — it’s often the biggest offender
- Unplug the coffee maker when not in use (or plug it into a switched power strip)
- Run the dishwasher only when full
Room 4: Home Office
Measure these appliances:
- Desktop computer (draws 50–200W when running, 5–30W when sleeping)
- Monitor (20–50W when on, 1–3W when sleeping)
- Printer (standby draw from wireless features)
- Wi-Fi router (runs 24/7 — often $10–$15/year)
- Modem (runs 24/7 — usually $5–$10/year)
- Desk lamp
- External hard drive or NAS (if you have one)
What to expect:
- Desktop (8 hrs/day + sleep): $25–$50/year
- Monitor (8 hrs/day): $10–$20/year
- Printer (standby 24/7): $8–$15/year
- Router + modem (24/7): $15–$25/year
Quick wins in this room:
- Use an advanced power strip: when the computer shuts down, the strip cuts power to all peripherals
- Put router/modem on a smart plug scheduled to reboot weekly (also improves reliability)
- Set computer to hibernate instead of sleep
Room 5: Bathroom
Measure these appliances:
- Hair dryer (high draw, but only used for minutes)
- Electric toothbrush charger (idle draw)
- Vanity lights (LED vs. incandescent)
- Space heater (if you use one — huge energy draw)
What to expect:
- Hair dryer (10 min/day): $3–$8/year
- Toothbrush charger: $0.50–$1/year
- Vanity lights (30 min/day, incandescent): $5–$10/year
- Space heater (4 hrs/day, winter): $80–$150/year
Quick wins in this room:
- Replace vanity bulbs with LEDs (immediate savings)
- Unplug the toothbrush charger when not in use
- Avoid space heaters if possible — they’re the biggest energy hogs per minute of use
Room 6: Laundry / Utility
Measure these appliances:
- Washer (measure a full cycle)
- Dryer (measure a full cycle — usually the biggest single-use appliance)
- Water heater (if it’s not gas — but usually hardwired and can’t be measured)
- Vacuum cleaner (measure one cleaning session)
What to expect:
- Washer (1 load/week): $15–$30/year
- Dryer (1 load/week): $30–$60/year
- Vacuum (1 hr/week): $3–$8/year
Quick wins in this room:
- Wash clothes in cold water (saves 90% of washer energy)
- Air-dry clothes when possible
- Clean the dryer lint trap every load (improves efficiency)
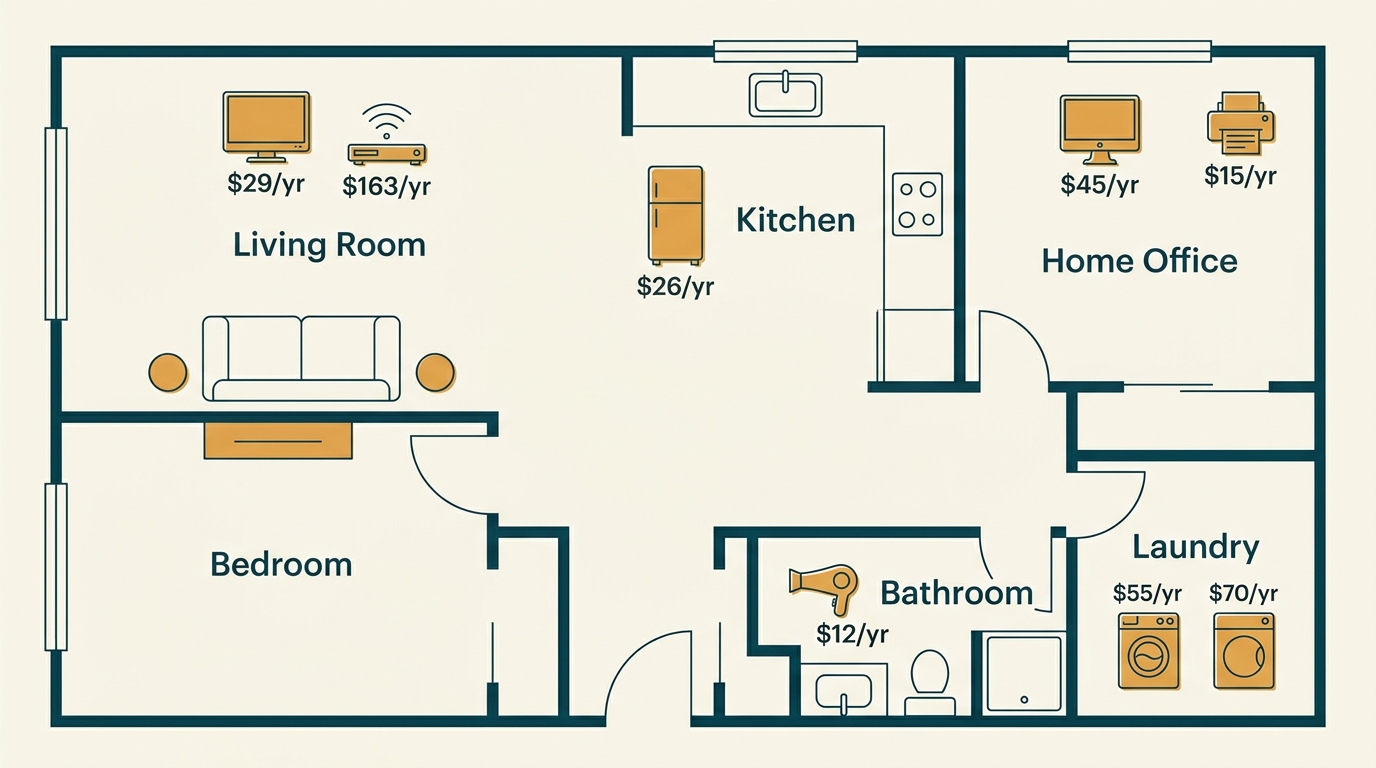
Apartment audit map: where the biggest energy drains hide
Sample Completed Audit (Real Apartment Example)
Here’s what a complete audit looks like for a typical 1-bedroom apartment:
| Appliance | Room | Daily KWH | Daily Cost | Annual Cost | Priority |
|---|---|---|---|---|---|
| Old refrigerator (pre-2000) | Kitchen | 2.80 | $0.45 | $163 | 🔴 High |
| Cable box (24/7) | Living Room | 0.50 | $0.08 | $29 | 🔴 High |
| Desktop computer (8 hrs + sleep) | Home Office | 0.45 | $0.07 | $26 | 🔴 High |
| Gaming console (standby) | Living Room | 0.35 | $0.06 | $20 | 🟡 Medium |
| Wi-Fi router (24/7) | Home Office | 0.15 | $0.02 | $9 | 🟡 Medium |
| Incandescent bulbs (5 total) | All rooms | 0.30 | $0.05 | $18 | 🟡 Medium |
| Microwave (standby) | Kitchen | 0.02 | $0.003 | $1 | 🟢 Low |
| Coffee maker (standby) | Kitchen | 0.01 | $0.002 | $0.50 | 🟢 Low |
| Phone chargers (3 idle) | Bedroom | 0.03 | $0.005 | $1.50 | 🟢 Low |
| Total | 4.61 | $0.74 | $268 |
Key insight: 3 appliances (refrigerator, cable box, computer) account for $218 of the $268 total — that’s 81% of the wasted energy. Focus there first.
The 80/20 Rule of Home Energy Audits
80% of your energy waste comes from 20% of your appliances.
This is critical for renters, because:
- You can’t fix everything
- You can’t replace the landlord’s appliances
- You don’t have infinite time or money
What you CAN do:
- Measure first, act second
- Focus on the top 3 hogs (usually: refrigerator, cable box, computer/console)
- Apply renter-safe solutions (smart plugs, power strips, habit changes)
- Ignore the low-priority items (microwave clock, phone chargers)
Chapter 5: Turning Measurements Into Savings Actions
You’ve measured. Now what? Here’s how to turn data into dollars.
The Four Actions (In Order of Priority)
Action 1: Automate the 24/7 Devices
If a device runs 24/7 and doesn’t need to, automate its shutdown. This is where smart plugs shine.
Best candidates:
- Cable/satellite box (schedule to power off between 1 AM and 6 AM)
- Gaming console (schedule to power off when you’re not gaming)
- Coffee maker (schedule to power off after 30 minutes)
- Printer (schedule to power off overnight)
Tools needed:
Expected savings: $50–$200/year
🛒 Check Kasa KP405 on Amazon💡 Renter warning: Before scheduling a DVR or cable box to power off, verify it doesn’t lose recordings or miss updates. Some devices need continuous power to function correctly.
Action 2: Replace Inefficient Bulbs
If your audit shows incandescent or halogen bulbs, replace them with LEDs immediately.
Why this matters: If your apartment has 15 incandescent bulbs (60W each), you’re spending roughly $270/year on lighting. Switching to LEDs cuts that to $40/year — a savings of $230/year.
Tools needed:
The Philips Selectable White A19 covers five color temperatures (2700K–5000K) in a single bulb, so you can tune it per room without buying different SKUs.
Expected savings: $100–$300/year
For a complete guide, see our article: Best LED Bulbs for Renters.
🛒 Check Philips Selectable White on AmazonAction 3: Use Advanced Power Strips for Entertainment/Office
If your audit shows multiple devices in one area drawing standby power, an advanced power strip solves the problem in one purchase.
How it works: The “master” outlet (usually for the TV or computer) controls the “switched” outlets. When the master device powers off, the switched outlets cut power automatically.
Best candidates:
- Entertainment center (TV + console + soundbar + streaming device)
- Home office (computer + monitor + printer + speakers + charger)
Tools needed:
Expected savings: $30–$80/year
Action 4: Change Habits for Non-Automatable Devices
Some devices can’t be automated easily. For these, habit changes are the solution.
Common habit changes:
| Device | Old Habit | New Habit | Annual Savings |
|---|---|---|---|
| Washer | Warm water | Cold water | $15–$30 |
| Dryer | Full heat, long cycle | Medium heat, sensor dry | $20–$40 |
| Space heater | Always on | Timer + blanket | $50–$100 |
| Air conditioner | Set to 68°F | Set to 74°F | $50–$120 |
| Coffee maker | Left on all morning | Auto-off after 30 min | $5–$15 |
Expected savings: $50–$150/year
Prioritization Matrix: Where to Focus First
Not all savings are equal. Here’s how to prioritize:
| Action | Upfront Cost | Annual Savings | Payback |
|---|---|---|---|
| LED bulbs | $40–$70 | $100–$300 | 2–5 months |
| Smart plug | $12–$25 | $50–$150 | 2–4 months |
| Advanced power strip | $20–$35 | $30–$80 | 5–10 months |
| Habit changes | $0 | $50–$150 | Immediate |
| Replace old refrigerator | $600+ | $90–$130 | 5–7 years ⚠️ |
Renter recommendation: Focus on LED bulbs, smart plugs, and habit changes first. These have the best ROI and are fully portable.
For a complete breakdown of smart plug options, see our Best Smart Plugs for Apartments guide.
Your Complete Savings Plan
If you implement all four actions, here’s a realistic savings estimate:
| Action | Annual Savings |
|---|---|
| Replace incandescent bulbs with LEDs | $150 |
| Automate cable box with smart plug | $25 |
| Automate gaming console with smart plug | $18 |
| Use advanced power strip in home office | $40 |
| Cold-water washing | $20 |
| Smarter AC/heater usage | $75 |
| Total | $328/year |
That’s a return of $328 on an upfront investment of ~$150 — a 218% return in the first year, and pure profit every year after.
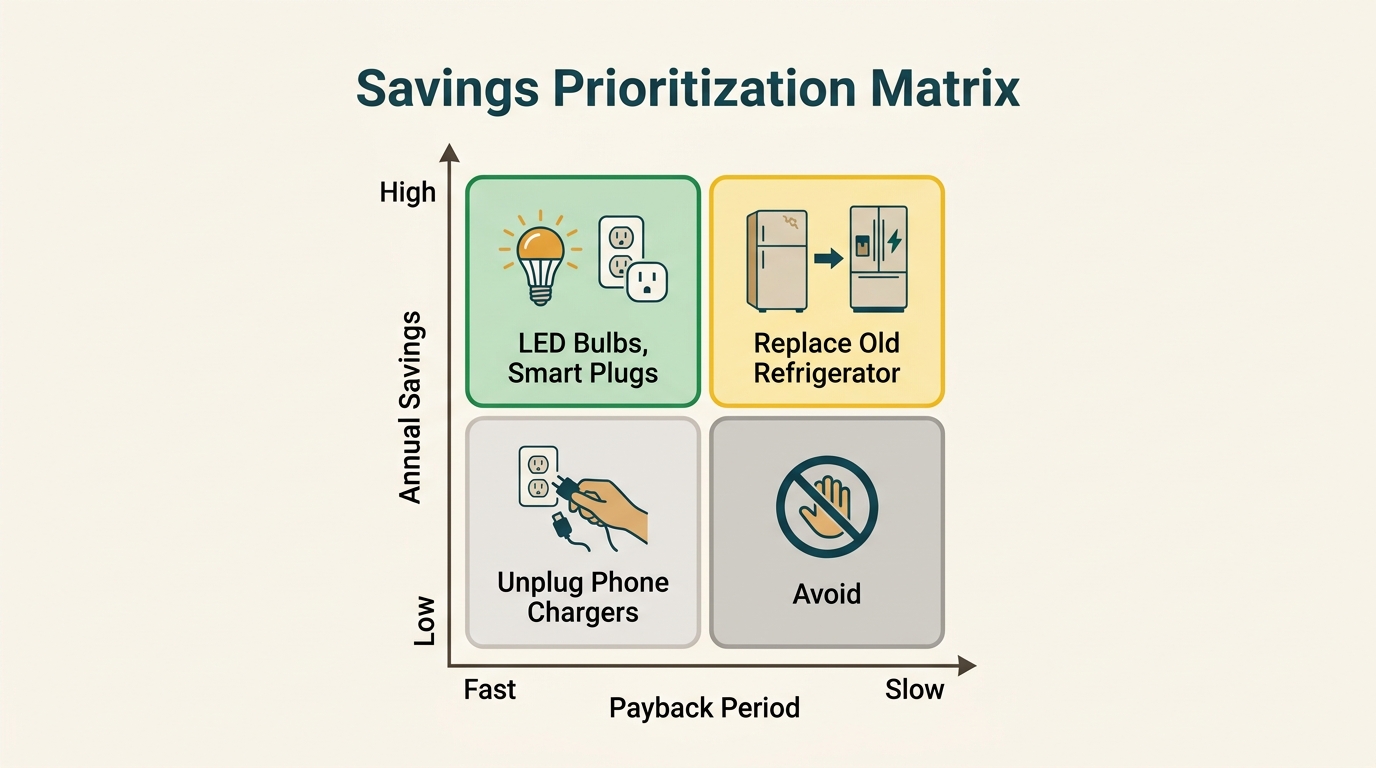
Savings prioritization matrix: where to start for maximum impact
Conclusion
The Kill A Watt meter is a $25 device that answers the single most important question in home energy savings: “Where is my money actually going?”
Without it, you’re guessing. You might spend $50 on smart plugs and save $5 — because you automated a low-draw device. Or you might ignore your old refrigerator and leave $160/year on the table.
With it, you have data. You know exactly which appliances cost $100+ per year and which cost $1. You know where to focus, and where to ignore. You know the difference between good advice and personalized advice.
Your action plan:
- Buy a Kill A Watt meter (~$25) — the P3 P4400 is the standard model for renter audits
- List your 10 most-used appliances — focus on devices that run 24/7 first
- Measure each appliance for 24 hours — one appliance per day, 10 days total
- Build your “Energy Hog” list — use the spreadsheet template in Chapter 4
- Calculate annual cost per appliance — use the formula:
KWH × Rate × 365 - Prioritize your top 3 hogs — these are usually 80% of your waste
- Apply the four actions — automate, replace bulbs, use power strips, change habits
- Re-measure in 30 days — verify that your changes actually reduced consumption
The entire process costs $25 and takes about 30 minutes of active work. The savings range from $100 to $400 per year, depending on your apartment.
🛒 Start Measuring — Check Kill A Watt on AmazonNext step: If you haven’t already, read our Vampire Power in Rentals guide to understand the hidden devices draining your bill — and our How to Read Your Apartment Electricity Bill guide to decode every line of your bill before you start measuring.
Frequently Asked Questions
What is the difference between the Kill A Watt P4400 and newer models?
The P3 P4400 is the classic, widely-used model ($25) that measures kWh, watts, amps, volts, and hours. Newer models like the P4460 Kill A Watt EZ ($40) add features like:
- Cost calculation (enter your rate, and it shows dollar amounts directly)
- Battery backup (retains readings if unplugged)
- Larger display (easier to read)
For most renters, the P4400 is sufficient — especially if you’re comfortable doing the math yourself. If you’d rather have the meter do the math for you, the P4460 is worth the extra $15.
How long do I need to measure each appliance?
For appliances that run 24/7 (refrigerator, cable box, router), 24 hours is sufficient.
For appliances used in cycles (washer, dryer, dishwasher), measure a full cycle to get an accurate per-use cost. Then multiply by how many times per week you use it.
For appliances with variable usage (TV, computer), measure for a full week to capture weekday/weekend differences.
Can I measure an entire room’s energy use at once?
Not with a Kill A Watt. The meter measures one appliance at a time through a single outlet.
If you want to measure an entire room, you’d need a smart plug with energy monitoring on each outlet, or a whole-home monitor (which renters usually can’t install).
However, you can measure the room’s most-used appliance and estimate the rest. In most rooms, 1–2 devices account for 80%+ of the energy use.
Is the Kill A Watt safe to leave plugged in for days?
Yes. The Kill A Watt is designed for continuous use and has a 15-amp rating — the same as a standard U.S. wall outlet. It’s safe to leave in place for as long as you need.
One caution: Don’t use the Kill A Watt with appliances that draw more than 1,800W (15 amps × 120 volts). This includes large space heaters on high, electric kettles, and some hair dryers. Check the appliance’s wattage rating before measuring.
Does the Kill A Watt work with smart plugs or power strips?
Yes, but the placement matters:
- Kill A Watt → Wall → Power Strip → Appliances: Measures everything on the strip (useful for entertainment centers)
- Kill A Watt → Wall → Smart Plug → Appliance: Measures one device with smart control
- Smart Plug → Wall → Kill A Watt → Appliance: Not recommended — the smart plug may interfere with the reading
For most accurate results, plug the Kill A Watt directly into the wall outlet and the appliance directly into the Kill A Watt.
What if my reading seems wrong or inconsistent?
A few things to check:
- Verify the outlet voltage — press the Volt button. It should read 110–125V. If not, the outlet may have issues.
- Check for high-draw appliances on the same circuit — a hair dryer or space heater on the same circuit can affect readings.
- Reset and try again — sometimes a reading anomaly is just a glitch.
- Test with a known appliance — plug in an LED bulb with a known wattage and see if the reading matches.
If readings remain inconsistent, the unit may be defective. Contact P3 International for support.
Where can I buy a Kill A Watt meter?
The Kill A Watt is available at:
- Amazon — the P3 P4400 is the standard model (link below)
- Home Depot — often in the electrical or smart home section
- Lowe’s — similar location
- Local hardware stores — availability varies
- Library programs — some libraries lend Kill A Watt meters for free (check with your local library)
Renter tip: If you only need to do one audit, check if your local library has a Kill A Watt you can borrow. Many public libraries now loan them out as part of “energy efficiency kits.”
🛒 Check Kill A Watt Price on AmazonAbout This Article
WattDweller is a reader-supported publication dedicated to helping renters reduce energy costs without permanent modifications.
For information about how we develop and review content, see our Editorial Policy.
Sources: Energy and appliance data cited in this article comes from sources linked throughout the article, including the U.S. Department of Energy (DOE), ENERGY STAR, the Natural Resources Defense Council (NRDC), and Lawrence Berkeley National Laboratory.
Last Updated: September 24, 2026
Related reading
- Vampire Power in Rentals: 7 Hidden Devices Quietly Inflating Your Electricity Bill
- How to Read Your Apartment Electricity Bill (And Spot Overcharges Before You Pay)
- Best LED Bulbs for Renters: Brighten Your Apartment Without Rewiring
- Portable AC vs Window Unit: Which Is Better for Renters?
- Best Smart Plugs for Apartments: Energy Monitoring, Scheduling & No Wiring